Commands
Commands allow you to use any web, desktop, or XMPP client, if configured, to execute specific actions for a user.
The following commands are implemented:
!name <user name>- Sets the user's name.
!email <email>- Sets the user's email address.
!transferforce <operator username||operator email>- Transfers the chat directly to another operator by username or email.
!phone <user phone>- Sets the user's phone number.
!goto <url>- Redirects the user to the specified URL.
!translate- Starts the translation process. Works only in the web client.
!screenshot- Takes a screenshot of the user's screen. A link to the screenshot will be provided by the system assistant.
!contactform- Redirects the user to the contact form.
!block- Blocks the user.
!close- Closes the chat.
!closed- Closes the chat dialog but leaves the chat status as it was. Only supported in the web interface.
!delete- Deletes the chat.
!pending- Changes the chat status to pending.
!active- Changes the chat status to active.
!remark <your comments about a chat>- Adds remarks to the chat.
!info- Returns all available information about the user. Useful in XMPP clients to know more about a visitor.
!help- Returns a list of all possible commands.
!note <your comment>- Stores an operator comment for future reference.
!hold- Sets the chat status to hold, which stops the auto-responder.
!gotobot- Transfers the chat to a bot. The chat status will be changed to bot chat.
!files- Enables file upload for a particular chat if general file upload is disabled. The default message text is:
I have enabled files upload for you. [fupload]Upload a file[/fupload]. - For multi-language support, create a canned message with content like:
!files I have enabled files upload for you. [fupload]Upload a file[/fupload]. - To enable file upload without any message, send the command:
!files no
- Enables file upload for a particular chat if general file upload is disabled. The default message text is:
!stopfiles- Disables file upload if it was enabled by the
!filescommand. The default message is:Files upload was disabled! - To send a custom message, use:
!stopfiles files upload was disabled - To disable file upload without any message for the visitor:
!stopfiles no
- Disables file upload if it was enabled by the
!modal <form_id> <explain>- Shows a form module form with the passed ID and writes the provided explanation. The explanation is optional.
!modal https://example.com- You can also pass an external URL. More documentation is available here.
Sub-commands
When defining commands, you can include these subfield values:
--silent- A system message indicating the command was executed will not be stored.--update_status- The chat interface's right column will be updated (e.g., if your trigger sets subjects).
Bot commands
You can define a custom command:
- Based on a
bottrigger. - Or define a shortcut for existing commands.
System configuration -> Live help configuration -> Bot -> Commands
- Each command will then be available in the admin chat interface.
- Custom commands can also be implemented in extensions.
!arguments first --arg second --arg third
If a text message is defined as:
1. {args.arg_1_title} - {args.arg_1} {arg_1}
2. {args.arg_2_title} - {args.arg_2} {arg_2}
3. {args.arg_3_title} - {args.arg_3} {arg_3}
4. {args.arg_command_title} - Command name
The output will be:
1. Title of field - first first [first argument]
2. Title of field - second second [second argument]
3. Title of field - third third [third argument]
How to dispatch a custom event and listen in an LHC extension
Use the Update current chat > Dispatch Event command.
In bootstrap.php, listen for this event:
$dispatcher->listen('chat.genericbot_chat_command_dispatch_event', array($this,'listenDispatchEvent');
public function listenDispatchEvent($params) {
    if ($params['action']['content']['payload'] == 'my_command.custom_command') {
        // Your code in the extension
    }
}
How to listen for arguments in REST API Calls
In bot Rest API you can also configure something like this for dynamic field list.
In the field Custom argument 1 for the Rest API Call define content as an example. It will pass title with data only if operator has filled it.
{args.arg_1_title}{args.arg_1__not_empty__: }{args.arg_1}{args.arg_1__not_empty__
}{args.arg_2_title}{args.arg_2__not_empty__: }{args.arg_2}{args.arg_2__not_empty__
}{args.arg_3_title}{args.arg_3__not_empty__: }{args.arg_3}{args.arg_3__not_empty__
}{args.arg_4_title}{args.arg_4__not_empty__: }{args.arg_4}{args.arg_4__not_empty__
}
And in rest API you can define
{
"custom_fields_data": "Operator data:\nraw_{{custom_args_1}}"
}
Use directly custom args in API
In a REST API call, you can access arguments like this:
// json_encode output
{{args.arg_1_title}} - {{args.arg_1}}
{{args.arg_2_title}} - {{args.arg_2}}

// Raw output
raw_{{args.arg_1_title}} - raw_{{args.arg_1}}
raw_{{args.arg_2_title}} - raw_{{args.arg_2}}
UI to call a command directly from chat
Since v4.37, it's possible to call a command directly from a chat window.
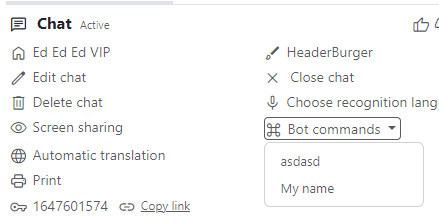
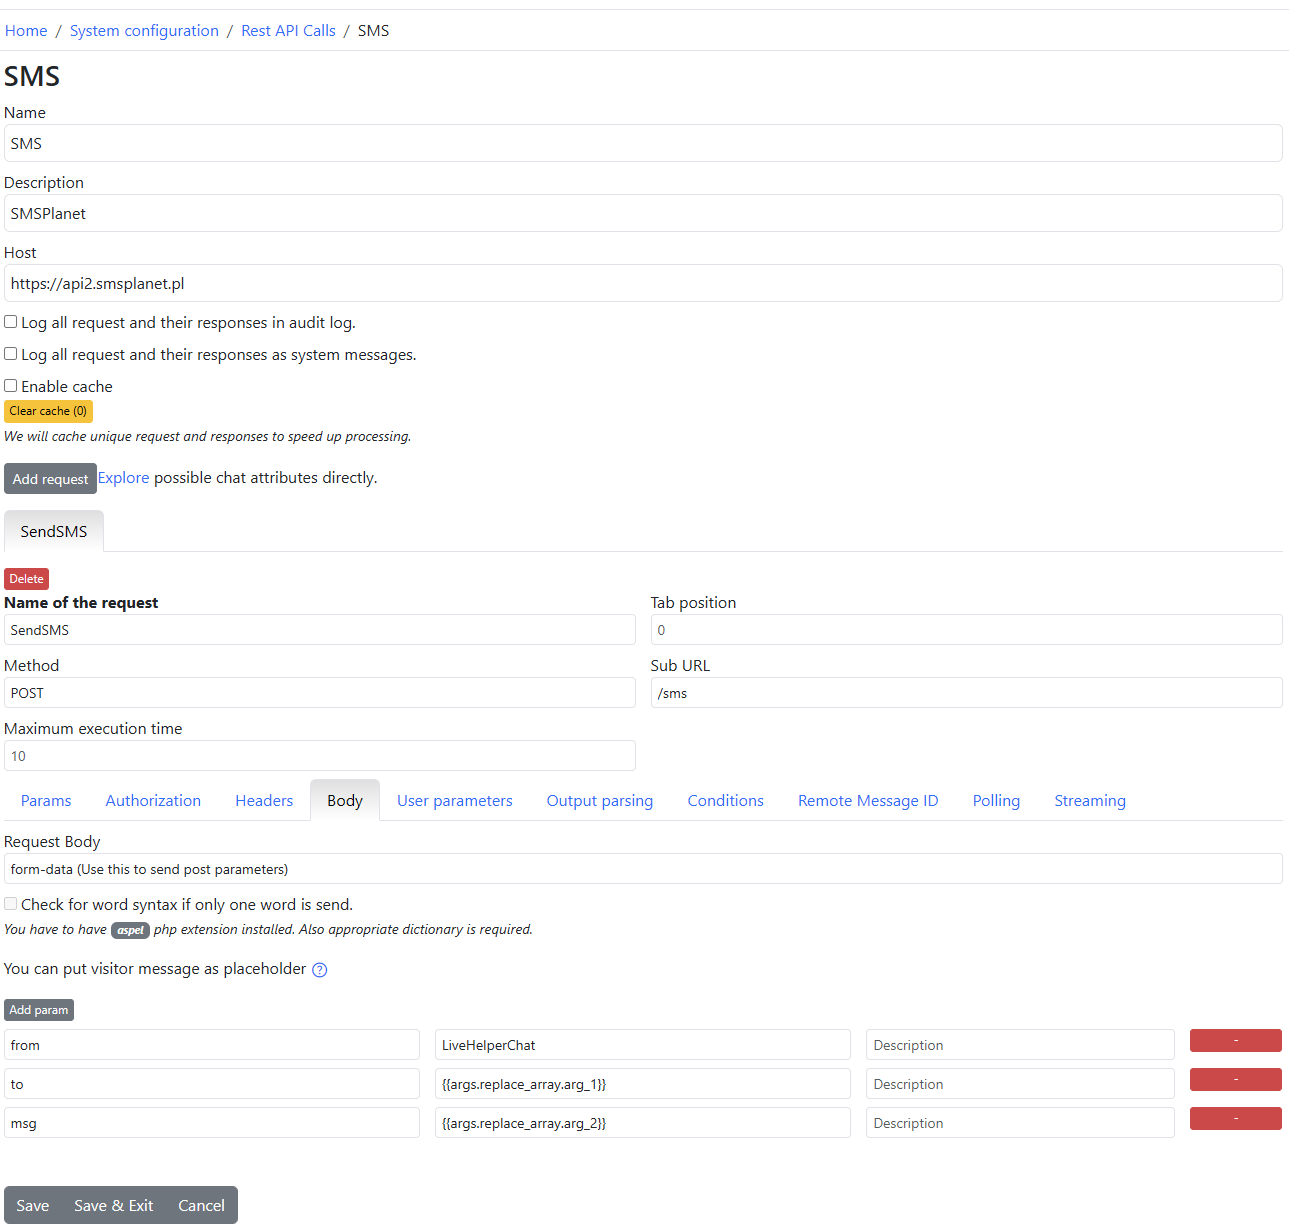
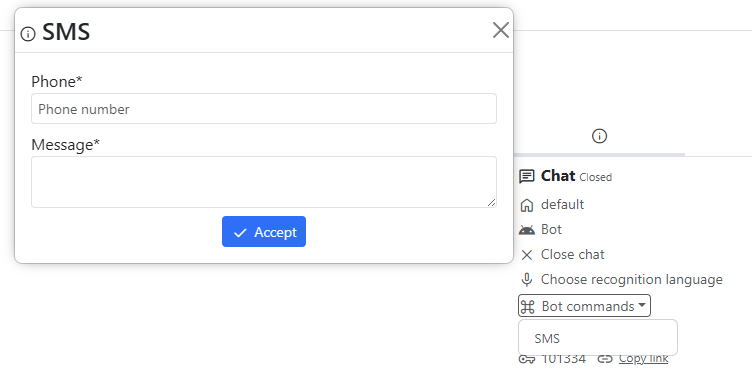
Example: Setting up a bot command for UI usage
Configure bot commands with two additional variables that operators can fill.

The SMS Bot will appear as follows:

These filled variables will be passed to the REST API call:
In the chat UI, it will look like this:
Required permissions:
lhchatcommand,use