Tutorial how to integrate n8n with Live Helper Chat
This tutorial demonstrates how to integrate n8n workflow automation with Live Helper Chat to create an AI-powered chatbot using OpenAI.
There is two flows in this integration
- Non async flow. Then we keep connection and receive response as soon all processes in the middle is kept. Connection is kept alive which is not ASYNC flow. CURL Limits applies php-resque is a must otherwise you will keep php-fpm connection alive with it's worker waiting for an answer.
- Async flow. Then we call webhook, and receive callback to our Rest API endpoint. This is async and preferred way.
Async flow for a visual walkthrough of this integration process, you can watch our tutorial video on YouTube.
Prerequisites
Before starting, you'll need:
- n8n instance (locally hosted or SaaS version from https://n8n.io/)
- Live Helper Chat installation with admin access
- OpenAI API key (for the AI assistant functionality)
Overview
In this integration example, we'll:
- Set up n8n to handle chat workflows
- Configure a Rest API connection between Live Helper Chat and n8n
- Create a bot that uses OpenAI as an assistant
- Connect everything together for automated responses
This tutorial provides a foundation that you can extend with your own custom workflows and integrations.
n8n Configuration
Flow example with NON async flow.
You can download the pre-configured n8n workflow file and import it directly into your n8n instance. Here we use Respond to webhook node type.
For Respond field we use Respond to Webhook Node.
Flow example with async flow.
There is two flows we import here
TransferOperator.jsonwhich is responsible for setting attribute which we will use afterward sending response. Download Transferring chat to pending status.LHCAgent.jsonAsync flow integration for n8n Download
Credentials setup for async flow
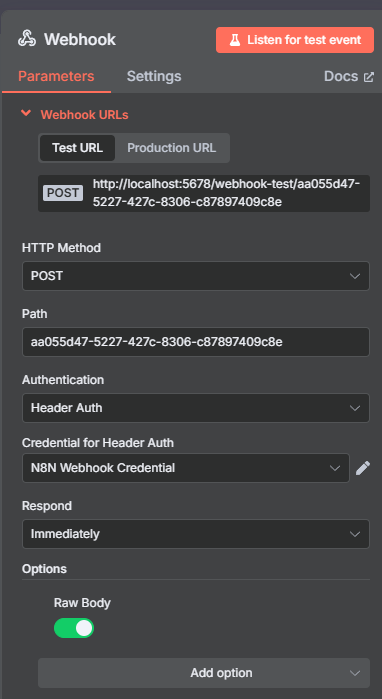
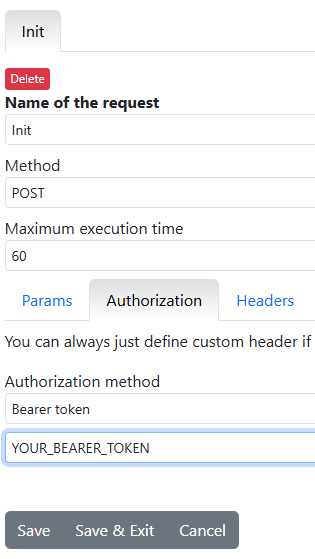
Please make sure to set up your authentification headers correctly!
- Calling n8n Async flow requires Authentification! In LHC Rest API configuration enter
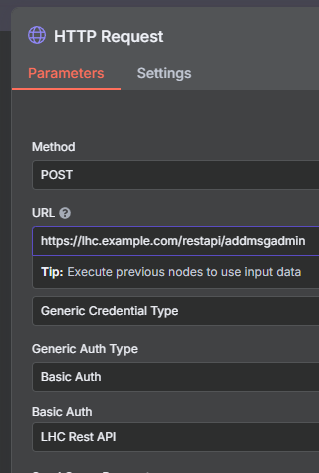
Authorization -> Authorization method -> Bearer token - Calling LHC Rest API Requires Basic auth just like https://api.livehelperchat.com/#/.
N8N Credentials
Credentials types in N8N
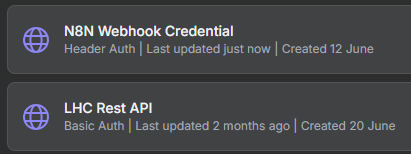
Webhook in N8n Uses N8N Webhook Credential
And this credential is put in
Live Helper Chat Credentials
This credentials is used to make call to LHC after N8N flow is completed. More information
Important: Configure OpenAI Credentials
Before using the workflow, you must configure your OpenAI API credentials in n8n:
- Open the imported workflow in your n8n instance
- Locate the OpenAI node in the workflow
- Click on the OpenAI node to open its configuration
- Enter your OpenAI API key in the credentials field
- Save the workflow
Without proper OpenAI credentials, the AI assistant functionality will not work.
Option 1: Local n8n hosting with Docker Compose
For local development, you can use the following docker-compose.yml file to quickly set up n8n with Redis:
- Create a new directory for your n8n setup
- Save the content below as
docker-compose.yml - Run
docker-compose up -din the same directory
version: '3.8'

services:
  redis:
    image: redis:7-alpine
    container_name: n8n_redis
    restart: unless-stopped
    volumes:
      - redis_data:/data
    networks:
      - n8n_network

  n8n:
    image: docker.n8n.io/n8nio/n8n
    container_name: n8n
    restart: unless-stopped
    ports:
      - "5678:5678"
    environment:
      - GENERIC_TIMEZONE=Europe/Vilnius
      - TZ=Europe/Vilnius
      - DB_TYPE=redisdb
      - DB_REDIS_HOST=redis
      - DB_REDIS_PORT=6379
      - DB_REDIS_DB=0
    volumes:
      - n8n_data:/home/node/.n8n
    depends_on:
      - redis
    networks:
      - n8n_network

volumes:
  n8n_data:
  redis_data:

networks:
  n8n_network:
    driver: bridge
Option 2: Using n8n SaaS
If you prefer to use n8n's hosted service:
- Sign up at n8n.io
- Create a new workflow
- Click Import and select the downloaded Async or Non-Async n8n flow file
Live Helper Chat Configuration
Step 1: Import Rest API Configuration
- Download the Non Async Rest API configuration or Async Rest API configuration
- In Live Helper Chat admin panel, go to System → Rest API
- Click Import and select the downloaded Async or Non-Async n8n flow file
- Configure the API endpoint to point to your n8n instance. Enter correct
HostandSub URL
Step 2: Import Bot Configuration
- Download the Non async bot configuration or Async bot configuration
- In Live Helper Chat admin panel, go to Chats → Bots
- Click Import and select the downloaded file
- During import, choose the Rest API configuration you imported in Step 1
Configuration Details
Step 3: Activate Bot in Department
After completing the configuration steps above:
- Navigate to System → Departments in the Live Helper Chat admin panel
- Select the department where you want to enable the n8n bot
- In the department settings, locate the Bot section
- From the bot dropdown menu, select your newly imported n8n bot
- Save the department configuration
The bot will now be active for incoming chats in the selected department.
n8n Workflow Setup
The imported n8n workflow includes:
- Webhook trigger to receive messages from Live Helper Chat
- OpenAI integration for AI responses
- Response formatting for Live Helper Chat compatibility
Testing the Integration
- Start a chat on your Live Helper Chat installation
- Send a message to trigger the bot
- Verify that the message is processed by n8n and returns an AI-generated response
Other use cases
There are a few YouTube videos which can help integrate n8n with various third party services and proxy them to Live Helper Chat