Update Current chat
With this trigger, you can perform the following actions:
Stop Chat and Transfer to Human
Using this trigger, a chat can continue in bot mode and execute triggers depending on the outcome. YouTube demo: https://youtu.be/AL7RVRcvOas
Transfer Chat to Bot
Using this trigger, you can transfer a chat back to a bot.
Close Chat
This trigger will close the chat. This is useful if the visitor is not authenticated, or for any other reason you might consider.
Set Chat Variable [Not Visible by Operator]
This trigger is useful for setting any internal chat attribute that should not be visible to the operator, but only to the system.
{"bot_touched":true}
If you set a value like the one below, the attribute will be removed.
{"bot_touched":null}
You can also store an object returned from a REST API:
{"debts":{content_5_json}}
After that, you can access any internal attribute or cycle through items.
These variables can later be used by the REST API as replaceable variables: {{lhc.var.<variable_name>}}
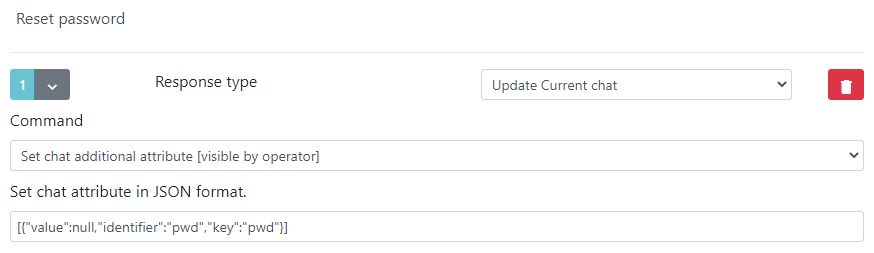
Set Chat Additional Attribute [Visible by Operator]
These variables will be visible to the operator.
[{"value":"Attribute value or {content_1}","identifier":"attribute_name","key":"Attribute Name"}]
How to Delete a Custom Collected Attribute?
This way, you can reset any attribute collected from custom fields using a bot. You have to fill both the key and identifier with the same field identifier and set the value as null.
Set Widget Live Attribute
This is useful while the widget is live.
Live attribute pathdefines the path of the attribute of the React APP state.Live attribute value in JSON format.
See how a bot uses it to control a survey.
Dispatch Event
If you are building a sophisticated workflow and need to listen to a custom event defined by you, you can use this trigger.
Event dispatch looks like this:
    erLhcoreClassChatEventDispatcher::getInstance()->dispatch('chat.genericbot_chat_command_dispatch_event', array(
        'action' => $action,
        'chat' => & $chat,
        'replace_array' => (isset($params['replace_array']) ? $params['replace_array'] : [])
    ));
To listen to this event in your extension's bootstrap.php file, you would need something like this:
public function run() {
    $dispatcher = erLhcoreClassChatEventDispatcher::getInstance();
    $dispatcher->listen('chat.genericbot_chat_command_dispatch_event', array($this, 'listenEvent'));
}

public function listenEvent($params) {
     if ($params['action']['content']['payload'] == '<Event Name>') {
        // $params['action']['content']['payload_arg'] - <Event argument>
    }
};
Update Main Chat Attribute
With this action, you can update any chat attribute. You can find all main chat attribute definitions at https://api.livehelperchat.com/. At the bottom, there will be a Models section; see the Chat model definition.
- In the command, choose
Update main chat attribute. - For
Chat attribute name, enter the attribute you want to change. - For
Chat attribute value, enter a value.
For the value field, you can also use replaceable variables as defined here. You can also use placeholders from the REST API. For example:
{content_1}up to{content_6}
If you want to set a visitor's nick, email, phone, or any other attribute from the REST API:
- Set
Chat attribute nametonick. - Set
Chat attribute valueto{content_1}.
How to Set a Product Attribute?
You can also set a product directly from a bot.
- To do this, you will need a
product_id(more information). - In the command, choose
Update main chat attribute. - For
Chat attribute name, enterproduct_id. - For
Chat attribute value, enter yourproduct_idfrom the product list./site_admin/abstract/list/Productor just click edit, and in the URL, the last number will be aproduct_id.
Change Department
You can also change the department with Update main chat attribute. Since v3.42, an improvement was made, and now it's clearer how to change the department.
There is a multiple format you can enter as department:
- Enter new department ID directly
Enter department ID. You can find the ID in the department list. - You can enter brand identifier.
- Enter chat variable E.g
{args.chat.chat_variables_array.new_dep_id}
Disable Visitor Sending Messages Until the Next Operator/Bot Message
This disables the possibility for a visitor to send a message until there is some response to their previous message. It's useful in a ChatGPT integration case if we want to wait until the bot responds to our previous request.
Set Subject
You can add a subject to the chat automatically by entering the subject ID.
For the value field, you can also use replaceable variables as defined here. You can also use placeholders from the REST API. For example:
{content_1}up to{content_6}
This also supports email events and continuous webhooks as chats.
Remove Any Previous Process
In case you allow a visitor to start another information collection process in the middle of one, you might encounter an error message like Please complete previous process.
If you want to clean up any previous process, you can use this response type before executing the Collect custom attribute response type.
Another way to avoid this error is to check the Soft event mark in the Collect custom attribute response type. We will automatically terminate it if the user starts another one.
Set meta_msg Attribute
This updates the visitor message's meta_msg attribute.
For example, from sentiment per message trigger:
{"sentiment":"{content_1}","sentiment_value":{content_2}}
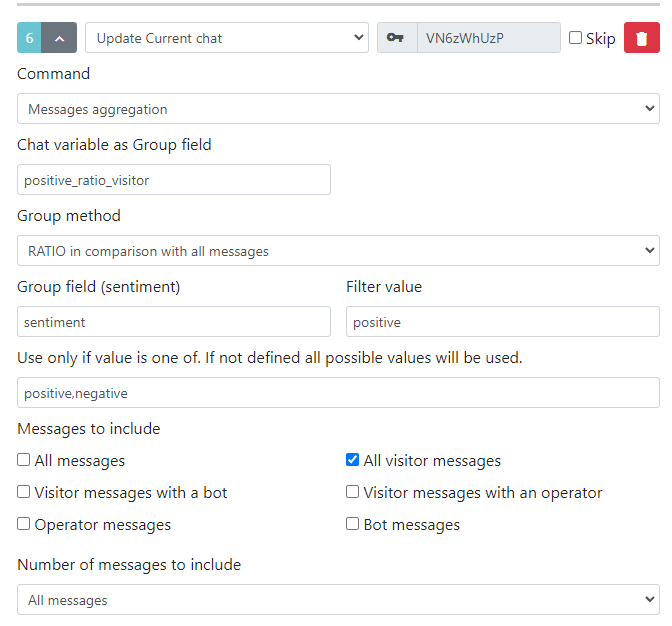
Messages Aggregation
This response type iterates through all chat messages and calculates desired aggregation values.
Fields description:
Chat fields:
Chat variable as Group field- the main variable to store the grouped field.Calculated value from group method- the score value of the grouped result.
Message fields by which we should do grouping:
Group field (sentiment)- stores the initial grouping field (e.g.,sentiment).Group value field. Eg (score field of the sentiment)- stores the score of the sentiment (sentiment_value).
Aggregated messages sample:

AVG
Groups messages by Group field (sentiment) and calculates the average of Group value field. Eg (score field of the sentiment). The highest average is stored within the chat as Chat variable as Group field (e.g., sentiment_visitor, and the average itself as sentiment_visitor_value).
E.g., 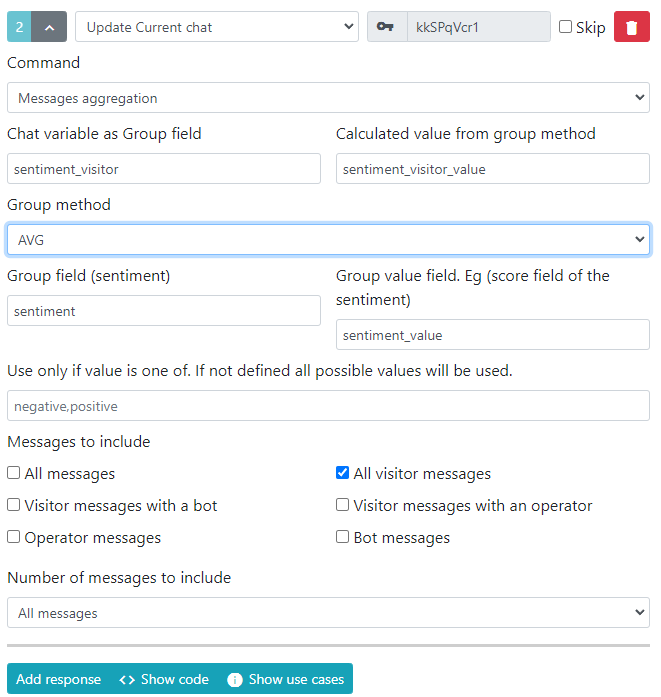
SUM
Instead of the average, we compare by the sum of the grouped fields.
SUM as Comparator and AVG as Value
Similar to AVG, just the aggregation value is chosen by the sum of the Group value field. Eg (score field of the sentiment), but the value itself is the AVG.
MAX
Finds the MAX from the grouped fields and stores it as an aggregated field and its value.
From the sample, it would be {"sentiment":"positive","sentiment_value":0.9620355963707}.
MIN
Finds the MIN from the grouped fields and stores it as an aggregated field and its value.
From the sample, it would be {"sentiment":"neutral","sentiment_value":0.56032991409302}.
COUNT MAX (Maximum Number of Grouped Records)
Chooses the most frequent value of the grouped field. In case of the same score, the very first one would be stored.
COUNT (Total Number of Messages)
Stores only the count of the selected message type.
COUNT FILTER (Filtered by Group Value Field)
Stores only the count of the selected message type, plus applies filtering by message meta_attr.
RATIO in Comparison with All Messages
Stores the ratio compared to all/filtered messages.
In this sample, we store the ratio of positive messages compared to negative messages.
E.g.,