Text message
Introduction
This article explains text element. Text element looks like for visitor
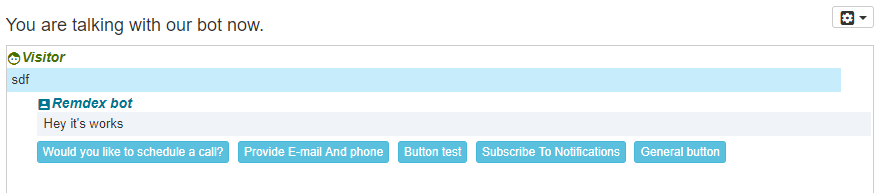
In back office it looks like this
Attributes
Text message
Text message can have few sending options
- {default messaget[show from hour, show till hour]} inclusive is first hour. Few examples
- Default message
{welcome_message__Welcome to our website}{good_evening__Good evening__t[17:24]}- Show this message from 17 until midnight{good_morning__Good morning__t[0:17]}- Show this message from midnight until evening{good_morning_monday__Good morning monday__t[7:9]||1}show this message only on Monday{good_morning_tue_wed__Good morning monday__t[7:9]||2,3}show this message only on Tuesday and Wednesday{cond__Condition text__c[["{args.chat.id}","eq","1647604015"],["chat_variable","eq","1"]]}Read more about possible check conditions
- You can give random answer by separating messages by
|||or just clicking
- It has to be as a separate character from the new line
- Or wrap it with spaces so it won't be included in any other parsing tags.
First message part before text message is text identifier and can be used to translating messages to multiple languages.
It is important to use different identifier per message. good_morning_monday and good_morning_tue_wed are different although translation are similar.
Replaceable variables
Text area supports these replaceable variables
{lhc.nick}{lhc.email}{lhc.department}{lhc.add.<field identifier>}- supports only first level attributes{lhc.var.<variable key>}- supports only first level attributes{args.chat.<any chat attribute>}You can see all available variables using this modal window{args.chat.incoming_chat.chat_external_id}- incoming chat id{args.chat.incoming_chat.payload_array.*}- first payload attributes in array format{args.msg.msg}- visitor message.{args.msg.msg_plain}- visitor message without file tags.{args.chat.online_user.previous_chat.chat_variables_array.vip}- access previous chat variable{args.chat.chat_variables_array.debts.0.nit}- you can go as deep as you want to show chat variable{args.chat.chat_variables_array.order_id}- accessorder_idfrom additionally defined chat variable which is stored asThis variable is invisible for operator and will be stored in chat_variables attribute{args.msg_text}- payload value if button/dropdown value click is unknown.{args.chat.online_user.previous_chat.<previous chat attribute>}This is usefull if on chat start you want to update present chat attributes based on previous one. This action should be executed on chat start trigger. Few examples{args.chat.online_user.previous_chat.nick}- access previous chat nick{args.chat.online_user.previous_chat.chat_variables_array.debts.0.nit}- access previous chat chat variables
{msg_id}- present message id.{base_url}- Base URL to the application. E.ghttps://chat.example.com,https://example.com/lhc_web/index.php{args.current_trigger.<id|name>}- current trigger id. Stores current trigger{args.first_trigger.<id|name>}- first trigger id. As during bot trigger execution multiple triggers can be involved this variables stores very first one.{random_20}- generate random string length of 20{rnumber_10_<end_number>}- generate random number.{rnumber_10}- random number from 1 till 10 inclusive{rnumber_10_20}- random number from 10 till 20 inclusive
{args.chat.chat_dynamic_array.*}- variables which were defined by extensions. Lear how to define your own custom variables.{args.chat.id}Chat object also see__getmethod for magic attributes likedepartmentoruser{args.chat.user.name_support}name visible in the widget or{args.chat.user.name_official}name visible in the back office
{current_time_ts}current time in unix timestamp. E.g[dateformat=Y/m/d, H:i:s]{current_time_ts}[/dateformat]{args.msg.udate__datef__Y-m-d H:i}Use field timestamp and format a date
If message is media_type you can access uploaded file attributes
{args.msg.file.file_body_embed}- will generate[chatfilebody=2013_fcff8995f3b457b586e3b2bba62e1d7f]which afterwards will be used forfile_bodyreplacement.{args.msg.file.file_body}-'data:'.$this->type.';base64,'.base64_encode(file_get_contents($this->file_path_server));OpenAI requires{args.msg.file.file_body_embed_raw}- will generate[chatfilebodyraw=2013_fcff8995f3b457b586e3b2bba62e1d7f]which afterwards will be used forfile_body_rawreplacement.{args.msg.file.file_body_raw}-base64_encode(file_get_contents($this->file_path_server));Gemini requires
These are the main classes
args.chat.<attr>args.chat.user.<attr>args.chat.department.<attr>args.chat.incoming_chat.<attr>args.chat.incoming_chat.incoming.<attr>
All classes can be found here
You can also set value from Rest API E.g
{content_1}up to{content_6}(these will be string values){content_1_json}up to{content_6_json}(will be already json encoded string). This is usefull in case you set chat variable
Escaping variables for url and [html] blocks
Escape arguments are supported only for {args.* syntax.
{args.chat.plain_user_name__url}- escape argument in the url{args.chat.nick__url}- escape argument in the url{args.chat.nick__escape}- escape argument in the[html]{args.chat.nick__escape}[/html]block.{args.chat.nick__direct}- do not encode as JSON even if in text block this option is chosen.{args.chat.nick__json}-json_encodeis applied twice to the chat variable.
This feature is used in Jitsi integration
Or condition
{variable.location__or__variable.location_2__or__variable.location_3...}E.g iffrom_nameis empty usefrom_address{args.msg.from_name__or__msg.from_address}{variable.location__or__variable.location_2__or__string__Raw value as fallback}E.g iffrom_nameorfrom_addressis empty use textFallback{args.msg.from_name__or__msg.from_address__or__string__Fallback}
If conditions
This can be used anywhere and useful in case variable has to be not empty to be printed.
{variable.location__not_empty__Use this if not empty}E.g{args.msg.from_name__not_empty__<b>}{args.msg.from_name}{args.msg.from_name__not_empty__</b> }<{args.msg.from_address}><br/>{variable.location__is_empty__Use this if empty}E.g{args.msg.from_name__is_empty__From name is empty}
Foreach cycle
You can foreach any chat variable. In this scenario we foreach chat variable
{foreach=args[chat.chat_variables_array.debts]} - {args.item.debt_organisation} for the value of {args.item.debt_value}
{/foreach}
You can also loop {content_1} if it contains an array
{foreach=content_1} - {args.item.paid_at} {args.item.delivery_status}{/foreach}
Render as JSON. Do not miss {as_json} argument inside foreach loop. It's usefull for Rest API call Custom argument for the Rest API Call arguments rendering where it can be used as {{custom_args_1}} in Rest API call.
[{foreach=content_1}{as_json}{separator},{/separator}{"requested_at":{args.item.requested_at},"method_name":{args.item.approved_method_name}}{/foreach}]
Special variables
{separator},{/separator}put comma between elements{index_element}holds element index in the array
HTML message
Content of this textarea will be rendered as HTML directly. It also supports translations.
Example how to generate trigger button. Trigger in this case is 1355. Trigger ID you can see always in trigger menu.
To return to main menu click <a onclick='lhinst.updateTriggerClicked()' data-id="{msg_id}" data-payload="1355" class="action-image link-trigger-button">here</a>
Save as system message.
Message will be saved a system message and won't be visible by visitor. Might be usefull during Rest API calls integration if you want to store some information just for operators.
Save as a visitor message.
Sometimes you want to save a message as it was a visitor message.
Hide on next message.
This message will be auto hidden as soon there is at-least one other message after present one.
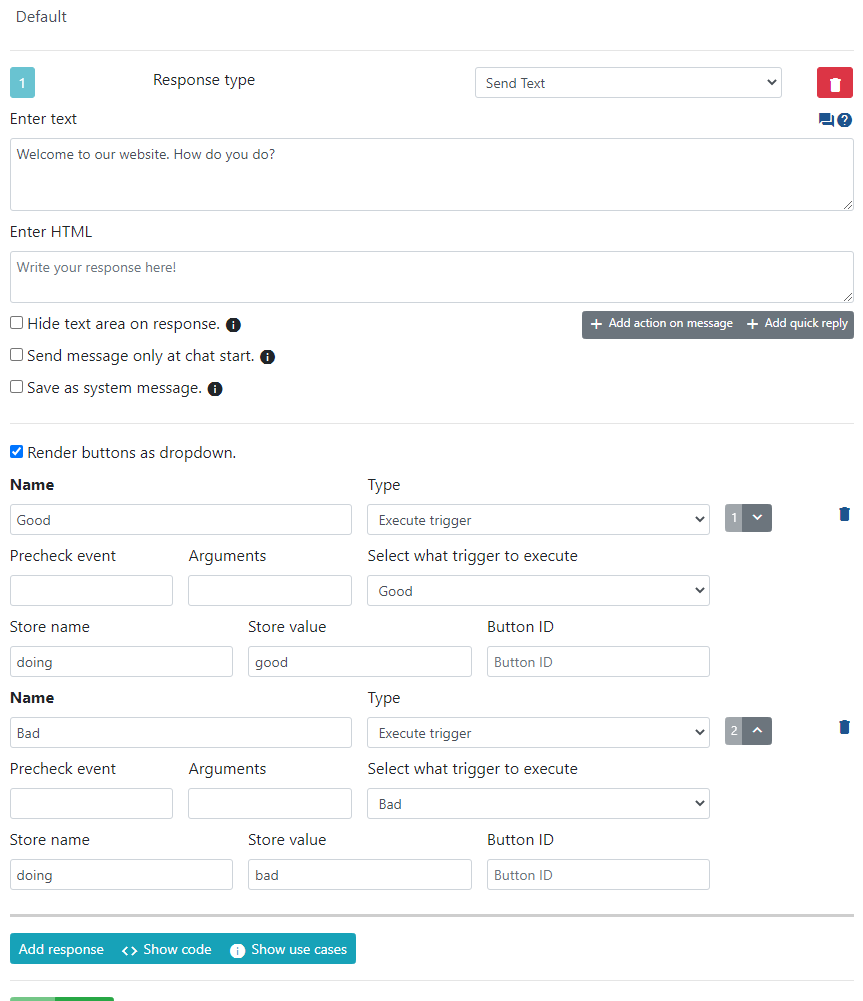
Render buttons as dropdown.
If you have many buttons. E.g countries you provide services. You can check this option and buttons will be rendered as dropdown options.
Render buttons even if it's not the last message.
This will render buttons even if buttons is not the last message in bot response.
Hide text area on response.
When this message is send area for a visitor to enter a message will be hidden. Make sure you include buttons in your response.
Send a message only at chat start
This message will be send only once and only on start chat event. If you have multiple triggers which is calling same text message. Sometimes it's usefull to have this.
Save as a log message.
Message will be saved as a log message.
Reaction options
Reaction allows to have reaction to bot message. They are visible for the operator in the back office.
- Reactions are available only for bot text messages.
- Operator can see reactions in the back office.
- Future releases might add support for admin reactions to visitor messages.
Few samples how thumb reaction can be setup.
Row structure
<Material Icon>|<internal value>|<identifier>|<Title,<optional>>
- Material icon - at the moment only
thumb_upandthumb_downis supported. - Internal value - You can put number or string. It's value is stored as selected value for identifier.
- Identifier - if multiple icons have same identifier other icon is unselected by value and new is selected.
- Title - you can put title for the icon.
Message body sample using Material Icons.
thumb_up|1|thumb|Thumbs up
thumb_down|0|thumb|Thumbs down
Message body sample using native UTF reaction icons.
👍|1|thumb|Thumbs up
👎|0|thumb|Thumbs down
You can listen to reaction also using. Sample values are based on above samples
erLhcoreClassChatEventDispatcher::getInstance()->dispatch('chat.reaction_visitor', array(
    'reaction_identifier' => $identifier,   // `thumb`
    'reaction_value' => $valueAction,       // `0` OR `1`
    'action' => $action,                    // `add` OR `remove`
    'msg' => & $message,                    // Message object
    'chat' => & $chat                       // Chat object
));
Styling reactions
For styling, you should use Widget themes -> Custom CSS -> Widget body additional CSS, takes effect after save section
Few samples
/* Have a different color for material icons thumb icons */
#messagesBlock .reaction-item,
#messagesBlock .reaction-item:hover {
    color:#FFF!important;
}

/* Thumb down icons should be red reaction-id-thumb-0 => reaction-id-<identifier>-<internal value> */
#messagesBlock .reaction-item.reaction-id-thumb-0 {
    color:red!important;
}

#messagesBlock .reaction-item.reaction-selected {
    /* Selected reaction item style */
}

/* Set various reaction bubble color options */
#messagesBlock div.reactions-holder {
    background-color:blue!important; /* Set custom background color*/
    border:1px solid red!important; /* Set custom border */
    border-radius: 5px!important; /* Set custom border radius */
}
Reactions always visible.
Reaction icons will be always visible.
Webhook execution delay
In case you are running php-resque worker and your messages are not delivered in the order you write in the bot you can add delay to any next message.
Quick reply options
These options defines visible buttons under a message.
Name
Just button name visible in frontend. Button names support translations by department
How to render button by department without cloning a bot?
Buttons are not rendered if their name is empty. In combination with bot translations you can have buttons to render for one department and empty for another.
Example of workflow if button should be rendered only for specific department.
- If you want to render button for specific department put it's name like
{<some_identifier>__}E.g{visible_for_a_department__}. Default value will be empty so button won't be rendered. - Create a translation with
visible_for_a_departmentas identifier in translation group - Modify department and assign translations group.
- Now bot will find button name in translation group and will render a button, but button won't be rendered for any other department.
Example of workflow if button should be rendered only for specific department.
- If you want to render button for all departments put it's name like
{<some_identifier>__Default name}E.g{visible_for_a_department__Default name}Default value will beDefault nameso button will be rendered. - Create a translation with
visible_for_a_departmentas identifier in translation group. Do not enter any value inDefaulttabTranslationfield - Modify department and assign translations group.
- Now bot will find button name in translation group and will not render a button, but button will be rendered for any other department.
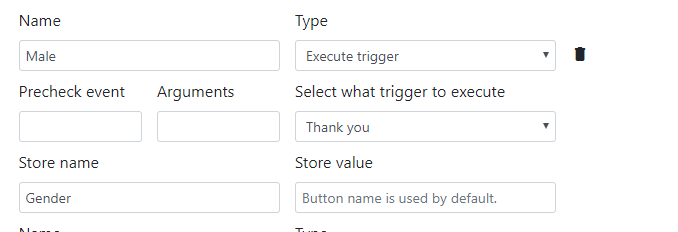
'Precheck event' and 'Arguments`
Sometimes you want to show the button depending on some validation. E.g user is logged/is some third party service available etc. If you set precheck event like valid_username Live Helper Chat will dispatch event like
$validationResult = erLhcoreClassChatEventDispatcher::getInstance()->dispatch('chat.genericbot_handler', array(
    'render' => $quickReply['content']['render_precheck_function'], // `valid_username`
    'render_args' => $quickReply['content']['render_args'],         // `Arguments`
    'chat' => & $chat,
));
When in your extension you can listen for this and validate it like this.
In bootstrap.php file listen for an event
$dispatcher = erLhcoreClassChatEventDispatcher::getInstance();
$dispatcher->listen('chat.genericbot_handler', array($this,'genericBotHandler'));
Function could look like
function genericBotHandler($params) {
    if ($params['render'] == 'valid_username') {
        return array(
            'status' => erLhcoreClassChatEventDispatcher::STOP_WORKFLOW,
            'content' => array(
                'valid' => false,
                'hide_button' => true // You can just disable it by replace this line with `'disable_button' => true`
            )
        );
    }
}
Type
Type describes what type of action will be executed/rendered. There is four types of actions in total.
URL
When visitor clicks a button we will open defined URL just as a link.
Click
This will issue defined payload. It's usefull if you are integrating third party AI bots. As this event can be passed to them.
Update Chat
These are quick updates you can do on button click. There are three types of events you can do from quick replies.
Transfer to operator [Depreciated]- I would personally just useExecute triggerand define a trigger where response type isUpdate current chatas then I can define more flexible transferring workflow.Transfer to bot [Depreciated]- Like an above written I prefer that workflow instead.Subscribe to notifications- this is usefull to define in default auto responder trigger and suggest visitor subscribe while they are waiting for an operator to accept a chat.Execute trigger- it's my preferred way to set actions as you can choose defined triggers from the list.Minimize widget- usefull in case you are showing intro button and want that one of them would minimize a widget. It can be used in proactive invitations also.
Store name
If you enter Store name button click will be recorded within chat in additional_data als you will recorded button click within chat itself.

Store value
If you enter Store value it will be used as value instead of button name.
Button ID
We will set this DOM element ID as defined in this field.
Bot conditions to satisfy
You can enter condition Identifier read more about conditions
Idea is that this button will be shown only if the condition is satisfied, otherwise the button will be hidden.
You can enter multiple conditions and all of them have to be satisfied.

and the condition itself can look like this
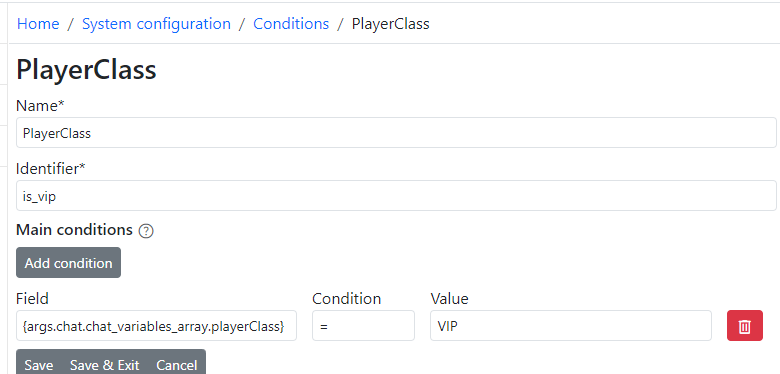
Conditions are checked only once on the first time bot message send action.
Add action on message
These are quick updates what happens on a message. I would suggest just use Collect custom attribute response type. See example how to use it.
Structure
Syntax for simple buttons looks like. This can be send directly as a meta_msg body to https://api.livehelperchat.com/#/api/post_restapi_addmsgadmin
[
  {
    "_id": "Hkhov7S77",
    "type": "text",
    "content": {
      "text": "Here is sample element",
      "quick_replies": [
        {
          "_id": "HJRmO7HQ7",
          "type": "button",
          "content": {
            "name": "Button",
            "payload": "about_us"
          }
        },
        {
          "_id": "S1TVdXSQm",
          "type": "url",
          "content": {
            "name": "google.com",
            "payload": "https:\/\/google.com"
          }
        }
      ]
    }
  }
]
How to's
How to display week day in my language?
There is two ways to do it.
- Have text directly in text message. You will have to create a bot individualization and assign it to department.
[dateformat=H:i]{current_time_ts}[/dateformat] - {wednesday__Wednesday__t[0:24]||3}[dateformat=H:i]{current_time_ts}[/dateformat] - {thursday__Thursday__t[0:24]||4}
- Another option is to have something like
{week_day__Day of week}and have bot individualization with that one stringweek_day- Default content will look like
{wednesday__Wednesday__t[0:24]||3}{tuesday__Tuesday__t[0:24]||2}
- Your language content E.g
[lt]will look like. It's in Lithuanian language {wednesday__Trečiadienis__t[0:24]||3}{tuesday__Antradienis__t[0:24]||2}