Mobile app setup
To ensure proper functionality of the mobile app, please use version 3.42 or higher.
Mobile Apps


The most recent build can be found here.
![]()
Maintaining Online Status
As background synchronization processes are halted once the app is closed, Live Helper Chat cannot determine your online status. To maintain your online status, consider the following:
- Set up department online hours.
- Change your online status to "Always online" instead of "Based on activity."
- Remember to set yourself to offline once your work shift is over.
Permissions
For the mobile app to function correctly, the operator must have permission for:
'lhrestapi','use_direct_logins'
Voice Messages from the Mobile Application
If you encounter an error while sending a voice message, you need to allow the upload of m4a, ogg, and wav files. This can be enabled in:
System configuration > Live help configuration > Files configuration
In the Allowed files types for operators setting, add |ogg|m4a|wav at the end.
Notifications
To enable mobile app notifications, enable mobile notifications in:
Configuration -> System -> Mobile (Settings)
You do not need to change anything else there.
Notification Categories
Mobile version 1.7 and LHC version 3.90 and later support mobile notification categories. These categories will appear after you receive your first notification in the mobile app. Afterward, you can customize notification settings for each category.
Ongoing Trigger Alerts
From version 3.93 onwards, you can also receive notifications in your mobile app when a subject is added to a chat.
To receive notifications when a subject is added to a chat:
- Ensure you are online.
- Choose at least one subject in the ongoing trigger alerts settings.
- Note that if you add the subject yourself, a notification will not be sent.
- You must have permission to write to the relevant department.
Testing Notifications
The easiest way to test notifications is to log in to the Live Helper Chat back office and go to System configuration -> Mobile (Sessions) and edit a session record. In the edit window, click Send test notification.
If you are not receiving notifications, check the following:
- Verify that you have enabled notifications in
Configuration -> System -> Mobile (Settings).
Often, iPhones may not receive notifications after app installation. If this occurs, try the following:
A Option
- After opening app for the very first time and granting notifications permissions kill the app
- Reopen the app. Add the server. Before 1.27v on initial login device token was not passed. It's fixed in 1.27v
- Delete the related session record in
Configuration -> System -> Mobile (Sessions). - Try to remove and add server again just.
B Option
- Uninstall the app.
- Delete the related session record in
Configuration -> System -> Mobile (Sessions). - Reinstall the app.
- Notifications should now function correctly.
Live Notification Testing
If you are not receiving notifications when a chat starts, but you do receive the test notification, check these points:
Floating notifications must be enabled in the notification settings of both Android and iOS. On Android, these can be enabled per notification category.
- Test notifications should only be visible on a locked phone screen.
- iOS
- Test notifications will be visible on the locked screen.
- They are not floating notifications and will not be seen on an unlocked phone, only on the locked phone screen.
- Test notifications do not affect whether the app is running or not.
- The unread count on iOS will not appear for test notifications.
- Android
- A red number appears on the unlocked phone app icon.
- They are not floating notifications and will not be seen on an unlocked phone, only on the locked phone screen.
- Test notifications do not affect whether the app is running or not.
- Scenario with live notifications:
- App is either running or not, and the phone is locked:
- iOS
- Notifications are seen on the locked phone screen.
- Android
- Notifications are seen on the locked phone screen.
- iOS
- The phone is unlocked, and the app is either running in the background or the app window is not active:
- iOS
- Notifications are seen on the locked phone screen.
- Android
- Notifications are seen on the locked phone screen.
- iOS
- The phone app is opened:
- A floating notification is seen at the top.
- Ensure you have the correct operator permissions.
- Verify that you are online as an operator.
- Confirm that you have enabled notifications in
Configuration -> System -> Mobile (Settings). - Ensure you have permission to access the department where the chat started.
- The app uses multiple notification channels, each with potentially different settings. Ensure the app's notification settings are correct.
- If a session's status is "thumbs down," you can delete the session, re-login from the app, and test notifications again.
Currently, clicking a notification does not open the chat window; it only opens the app. This will be addressed in future releases.
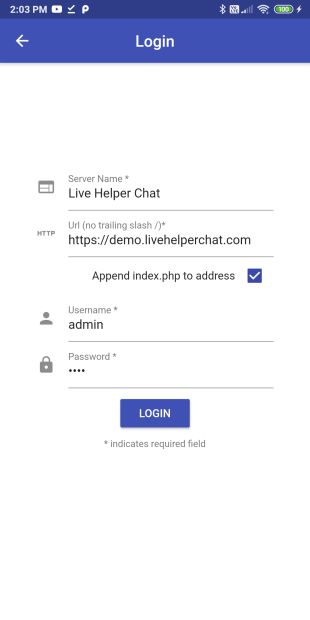
How to Log In
To log in to the demo of Live Helper Chat, use the following details:
- URL: https://demo.livehelperchat.com
- Login: admin
- Password: demo
- Uncheck "Append index.php to address"
I'm seeing you are not a chat owner and I can't send a message
- Make sure your server config includes
.htaccessfile from below.Troubleshooting Login Issues - Try to login with
usernameand not ane-mail. - Try remove and add server again after first change.
Troubleshooting Login Issues
- Make sure in
Settings > Mobile > Settingsyou have enabledEnable mobile application and mobile notifications - Make sure in main
settings.ini.phpfile'disable_rest_api_by_user' => falseis false. - Ensure that you have entered the domain address correctly. Pay attention to whether your URL requires
wwwor not, ashttps://www.example.comandhttps://example.comare treated as different URLs. - If you still cannot log in, apply the
.htaccessfile provided below, as theAuthorizationheaders are sometimes not parsed correctly by the Apache server. - Make sure your SSL configuration is valid by using https://www.sslshopper.com/ssl-checker.html
Apache configuration file for running in a root directory (e.g., https://example.com/index.php/site_admin/user/login or https://example.com/site_admin/user/login):
AddType application/wasm .wasm

<Files ~ "\.(gif|jpe?g?|png|bmp|swf|css|js|svg|otf|eot|ttf|woff|woff2|map|swf|mp3|ogg|wasm|wav|pdf|ico|txt)$">
  Header always Set Access-Control-Allow-Origin "*"
  Header always Set Access-Control-Allow-Methods: "GET, POST, OPTIONS, PUT, DELETE"
  Header always Set Access-Control-Allow-Headers: "Origin, X-Requested-With, Content-Type, Accept, API-Key, Authorization"
</Files>

RewriteEngine On

# If you encounter authentication issues with the Rest API, try uncommenting the following lines:
# https://stackoverflow.com/questions/26475885/authorization-header-missing-in-php-post-request

RewriteCond %{HTTP:Authorization} ^(.*)
RewriteRule .* - [e=HTTP_AUTHORIZATION:%1]

# Adds support for URLs without index.php
RewriteRule ^/var/[^/]+/cache/(stylesheets|images|javascripts?)/.* - [L]
RewriteRule ^upgrade.php - [L]
RewriteRule !\.(gif|jpe?g|png|bmp|css|js|xml|html|json|ico|mp3|wasm|ogg|wav|ogv|map|swf|flv|otf|woff2|woff|eot|ttf)|var(.+)storage.pdf(.+)\.pdf$ index.php

DirectoryIndex index.php
Apache configuration to try if you are running in a subdirectory (e.g., https://example.com/lhc_web/index.php/site_admin/user/login):
AddType application/wasm .wasm

<Files ~ "\.(gif|jpe?g?|png|bmp|swf|css|js|svg|otf|eot|ttf|woff|woff2|swf|mp3|ogg|wasm|wav|pdf|ico|txt)$">
  Header always Set Access-Control-Allow-Origin "*"
  Header always Set Access-Control-Allow-Methods: "GET, POST, OPTIONS, PUT, DELETE"
  Header always Set Access-Control-Allow-Headers: "Origin, X-Requested-With, Content-Type, Accept, API-Key, Authorization"
</Files>

RewriteEngine On

# If you encounter authentication issues with the Rest API, try uncommenting the following lines:
# https://stackoverflow.com/questions/26475885/authorization-header-missing-in-php-post-request

RewriteCond %{HTTP:Authorization} ^(.*)
RewriteRule .* - [e=HTTP_AUTHORIZATION:%1]
Entering Subfolder/Subdomain Details
- For a subdomain, the host would be
https://<subdomain>.example.org. - For a subfolder, the host would be
https://example.org/support.
Compiling the App
Refer to the Flutter documentation for compilation instructions. Here are a few quick tips:
You might need to adjust those files location to newer build locations
- Comment out these lines: https://github.com/LiveHelperChat/lhc_messenger/blob/1.1v/android/app/build.gradle#L18-L20
- Comment out these lines: https://github.com/LiveHelperChat/lhc_messenger/blob/1.1v/android/app/build.gradle#L39-L46
- Comment out these lines: https://github.com/LiveHelperChat/lhc_messenger/blob/1.1v/android/app/build.gradle#L53
- Comment out these lines: https://github.com/LiveHelperChat/lhc_messenger/blob/1.1v/android/app/build.gradle#L72
https://github.com/LiveHelperChat/lhc_messenger/tree/5b89256225b3374959b0596eb7da4ad510529e79
For compilation android studio with those SDK were used
- Flutter 3.35.4
- Dart 3.9.2 • DevTools 2.48.0
Creating a Firebase Project
- Create a project at https://console.firebase.google.com/.
- In the
Project overviewpage, add either Android or iOS, depending on the app you are configuring.

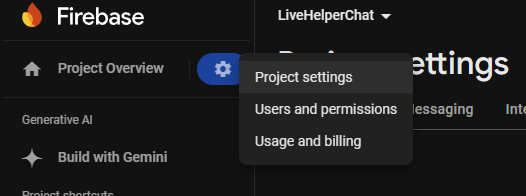
- Navigate to the
Project settingspage and click theService accountstab.
- Click
Generate new private key.
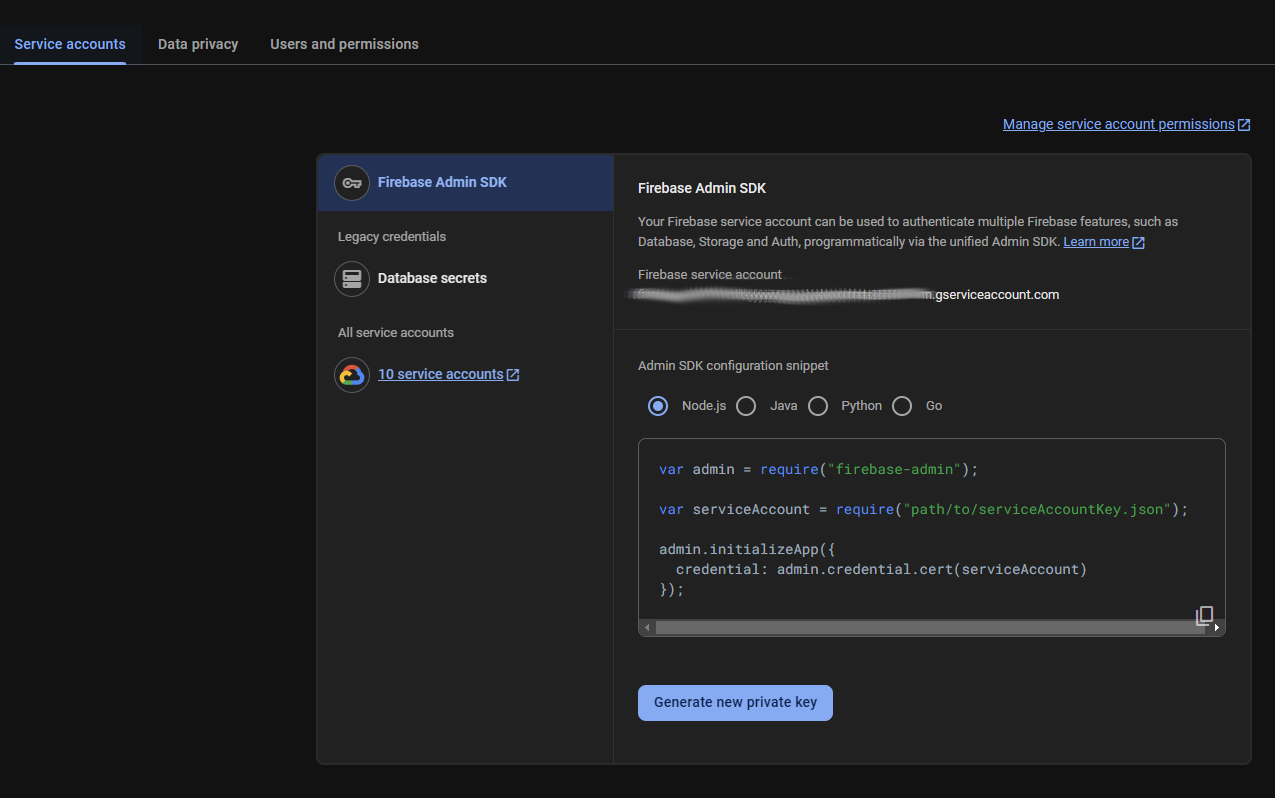
Afterward, you will download a *.json file, which you will use to generate a Bearer token for notifications.
Sending Notifications Using Your Own Firebase Project
Refer to this file. Recent versions of Firebase require a Bearer AccessToken, which I generate on my server. https://github.com/LiveHelperChat/livehelperchat/blob/145d6415a27701a367274550109e9703e5c2f9ba/lhc_web/lib/core/lhmobile/lhmobile.php#L525
<?php

header('Content-Type: application/json');

$presentToken = json_decode(file_get_contents('token.json'),true);

// Present token still valid
if (isset($presentToken['accessToken']) && $presentToken['exp'] >= time() + 1*60) {
    echo json_encode($presentToken);
    exit;
}

// Path to your service account file
$serviceAccountFile = 'location/to/service-account.json'; // Outside of web index.php file

// Load service account data
$serviceAccount = json_decode(file_get_contents($serviceAccountFile), true);

$clientEmail = $serviceAccount['client_email'];
$privateKey = $serviceAccount['private_key'];
$firebaseScope = 'https://www.googleapis.com/auth/firebase.messaging';
$tokenUri = 'https://oauth2.googleapis.com/token';

// Create JWT Header
$header = [
    'alg' => 'RS256',
    'typ' => 'JWT'
];

// Create JWT Claim Set
$now = time();
$exp = $now + 3600; // Token valid for 1 hour

$claims = [
    'iss' => $clientEmail,
    'scope' => $firebaseScope,
    'aud' => $tokenUri,
    'iat' => $now,
    'exp' => $exp
];

// Base64 URL Encode Function
function base64UrlEncode($data)
{
    return rtrim(strtr(base64_encode($data), '+/', '-_'), '=');
}

// Encode header and claim set
$encodedHeader = base64UrlEncode(json_encode($header));
$encodedClaims = base64UrlEncode(json_encode($claims));

// Sign the JWT
$signatureInput = $encodedHeader . '.' . $encodedClaims;
openssl_sign($signatureInput, $signature, $privateKey, 'SHA256');

// Encode the signature
$encodedSignature = base64UrlEncode($signature);

// Combine header, claims, and signature into the JWT
$jwt = $encodedHeader . '.' . $encodedClaims . '.' . $encodedSignature;

// Send a POST request to get the access token
$ch = curl_init();

curl_setopt($ch, CURLOPT_URL, $tokenUri);
curl_setopt($ch, CURLOPT_RETURNTRANSFER, 1);
curl_setopt($ch, CURLOPT_POST, 1);
curl_setopt($ch, CURLOPT_TIMEOUT, 10);
curl_setopt($ch, CURLOPT_CONNECTTIMEOUT,  10);
curl_setopt($ch, CURLOPT_SSL_VERIFYPEER, false);
curl_setopt($ch, CURLOPT_SSL_VERIFYHOST, false);
curl_setopt($ch, CURLOPT_USERAGENT, 'curl/7.29.0');

curl_setopt($ch, CURLOPT_POSTFIELDS, http_build_query([
    'grant_type' => 'urn:ietf:params:oauth:grant-type=jwt-bearer',
    'assertion' => $jwt
]));
curl_setopt($ch, CURLOPT_HTTPHEADER, ['Content-Type: application/x-www-form-urlencoded']);

$response = curl_exec($ch);

if (curl_errno($ch)) {
    http_response_code(400);
    echo json_encode(['error' =>  curl_error($ch)]);
    exit;
}

curl_close($ch);

// Decode the response to get the access token
$responseData = json_decode($response, true);

if (isset($responseData['access_token'])) {
    $accessToken = $responseData['access_token'];
    $tokenData = json_encode(['accessToken' => $accessToken, 'exp' => $exp]);
    echo $tokenData;
    file_put_contents('./token.json', $tokenData);
} else {
    http_response_code(400);
    echo json_encode(['error' => 'Could not get access token!']);
}
Using local service-account.json file
In mobile settings enable Use local service file and create file var/external/service_account.php with content from sample.
<?php
return '{
    "type": "service_account",
    "project_id": "",
    "private_key_id": "",
    "private_key": "",
    "client_email": "",
    "client_id": "",
    "auth_uri": "https://accounts.google.com/o/oauth2/auth",
    "token_uri": "https://oauth2.googleapis.com/token",
    "auth_provider_x509_cert_url": "https://www.googleapis.com/oauth2/v1/certs",
    "client_x509_cert_url": "",
    "universe_domain": "googleapis.com"
  }';
?>
Visitors Cannot See Typing Indicators
Most likely, this is an Apache configuration issue where the Authorization header is being removed. Refer to this article for a possible solution.
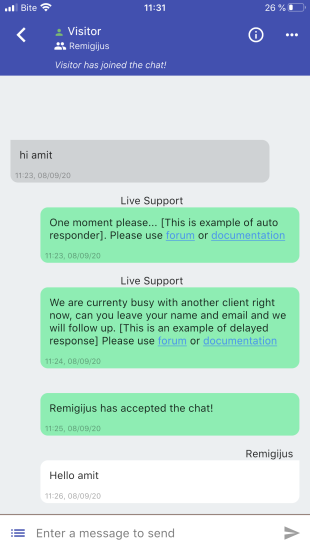
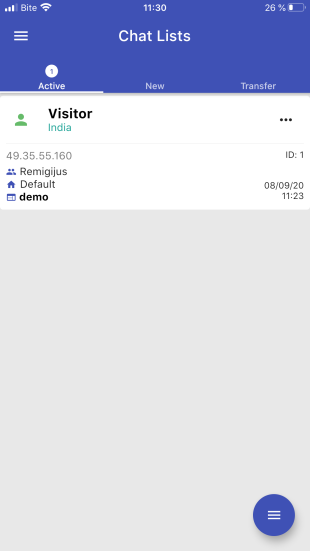
Demo Images